

How to Insert edit and delete using PHP and MySQL from Database
Introduction of PHP PDO
PHP is an open-source scripting language, which is extensively used for creating interactive, dynamic and user-friendly web pages. With the help PHP PDO, we can access a database such as MYSQL, SQLite etc. The PHP’s latest (5.1) version provided a new database connection abstraction library, which is PHP PDO (PHP Data Objects).
What is PHP PDO?
PDO stands for PHP Data Object, a PHP extension that defines a light-weight and consistent interface for accessing a database in PHP. It’s a set of PHP extensions that offer a PDO class and database driver. For more information please visit the PHP PDO official website.
In this tutorial, we can learn how to create Insert edit and delete using PHP and MySQL. This tutorial is a second part of the Registration and Login Form Free Download with PHP and MySQL. In the first tutorial, I explain how to create a responsively Registration, login, and admin dashboard using PHP and MySQL. If you want to learn how to create a Registration and Login Form Free Download with PHP and Mysql. Please visit the PHP category in the sidebar.
1. Getting Started
1.1 Requirements
- Dreamweaver/Notepad++
- Wamp server
- MySQL database
- PHP PDO Extension
- Bootstrap
1.2 File Structure & Setup

Create the below folder structure for your project setup.
Path : C:/wamp64/www/Insert edit and delete using PHP and MySQL
1.3 What We Will Learn in this Tutorial
Before starting the programming we need to create Insert edit and delete using PHP and MySQL, the below pages in the project folder directory.
Create page-top.php, This page is used to add all the javascript and CSS for the page design.
<?php
error_reporting(1);
include('common.php');
$user_data = new ADMIN();
?>
<!doctype html>
<html>
<head>
	<meta charset="utf-8">
	<title>Insert edit and delete using PHP and MySQL | HTML and CSS Tutorials </title>
	<link href="https://maxcdn.bootstrapcdn.com/bootstrap/4.0.0/css/bootstrap.min.css" rel="stylesheet">
	<link rel="stylesheet" type="text/css" href="font-awesome/font-awesome-5/css/fontawesome-all.min.css">
	<link rel="stylesheet" href="plugins/datatables-bs4/css/dataTables.bootstrap4.min.css">
	<link rel="stylesheet" href="plugins/datatables-responsive/css/responsive.bootstrap4.min.css">
	<script src="https://ajax.googleapis.com/ajax/libs/jquery/3.5.1/jquery.min.js"></script>
	<script src="https://cdnjs.cloudflare.com/ajax/libs/popper.js/1.16.0/umd/popper.min.js"></script>
	<script src="https://maxcdn.bootstrapcdn.com/bootstrap/4.5.2/js/bootstrap.min.js"></script>
	<script src="plugins/datatables/jquery.dataTables.min.js"></script>
	<script src="plugins/datatables-bs4/js/dataTables.bootstrap4.min.js"></script>
	<script src="plugins/datatables-responsive/js/dataTables.responsive.min.js"></script>
	<script src="plugins/datatables-responsive/js/responsive.bootstrap4.min.js"></script>
	<script src="js/jquery.validate.js"></script>
	<script src="js/formValidation.js"></script>
	<style>
		body {
			font-family: sans-serif;
			font-size: 13px;
		}

		.error {
			color: #e40000;
			font-size: 13px;
		}

		.displayImg {
			width: 70px;
		}
		.displaygr {
			width: 40px;
		}
		.help-block {
			font-size: 13px;
			font-family: sans-serif;
			font-weight: normal;
		}
	</style>
</head>

<body>
	<section class="testimonial py-2" style="border-bottom: 1px solid #e6e1e1;">
		<div class="container">
			<div class="row">
				<div class="col-md-9 py-3 shadow-sm">
					<img src="https://htmlcss3tutorials.com/wp-content/themes/htmlcss/images/logo.png" alt="HTML CSS3 Tutorials"/>
				</div>
				<div class="col-md-3 py-3 shadow-sm">
					<a href="https://htmlcss3tutorials.com/javascript-form-validation/" class="btn btn-primary">Back to Tutorial</a>
				</div>
			</div>
		</div>
	</section>
page-bottom.php : Paste the below code on page-bottom.php
<?php session_start(); ?>
<!-- page script -->
	<script>
		$( function () {
			$( "#example1" ).DataTable( {
				"responsive": true,
				"autoWidth": false,
			} );
		} );
	</script>
	<script type="text/javascript">
		$( document ).ready( function () {
			$( "#popup" ).modal( {
				show: false,
				backdrop: 'static'
			} );

			$( "#clickHere" ).click( function () {
				$( "#popup" ).modal( "show" );
			} );
		} );
		///--------------

		$( document ).ready( function () {
			$( "#edit" ).modal( {
				show: false,
				backdrop: 'static'
			} );

			$( "#clickedit" ).click( function () {
				$( "#edit" ).modal( "show" );
			} );
		} );
	</script>
	<script type="text/javascript">
		function readURL( input ) {
			if ( input.files && input.files[ 0 ] ) {
				var reader = new FileReader();

				reader.onload = function ( e ) {
					$( '#profile-img-tag' ).attr( 'src', e.target.result );
				}
				reader.readAsDataURL( input.files[ 0 ] );
			}
		}
		$( "#profile-img" ).change( function () {
			readURL( this );
		} );

			</script>
<script type="text/javascript">
		function readURL2( input ) {
			if ( input.files && input.files[ 0 ] ) {
				var reader2 = new FileReader();

				reader2.onload = function ( e ) {
					$( '#profile-img-tag2' ).attr( 'src', e.target.result );
				}
				reader2.readAsDataURL( input.files[ 0 ] );
			}
		}
		$( "#profile-img2" ).change( function () {
			readURL2( this );
		} );

			</script>
</body>
</html>- Create a database table
- Create index.php page
- Create addRecord.php page
- Create common.php
- Create deleteRecord.php
- Create editRecord.php
- Create editImage.php
- Create downloadCsv.php
- Create dbconfig.php
1. Create Database Table for Records
Create the below Database table in MySQL to store the record and retrieve them with PHP and MySQL. Execute the following MySQL query.
In this tutorial, I am using Bootstrap to design the button and user interface, So you can download the bootstrap package from the official website.
DROP TABLE IF EXISTS `demorecords`;
CREATE TABLE IF NOT EXISTS `demorecords` (
  `recID` int(11) NOT NULL AUTO_INCREMENT,
  `fullName` varchar(100) NOT NULL,
  `email` varchar(100) NOT NULL,
  `mobile` varchar(100) NOT NULL,
  `website` varchar(100) NOT NULL,
  `directory` varchar(100) NOT NULL,
  PRIMARY KEY (`recID`)
) ENGINE=MyISAM AUTO_INCREMENT=75 DEFAULT CHARSET=latin1;
2. Create index.php page to display the record
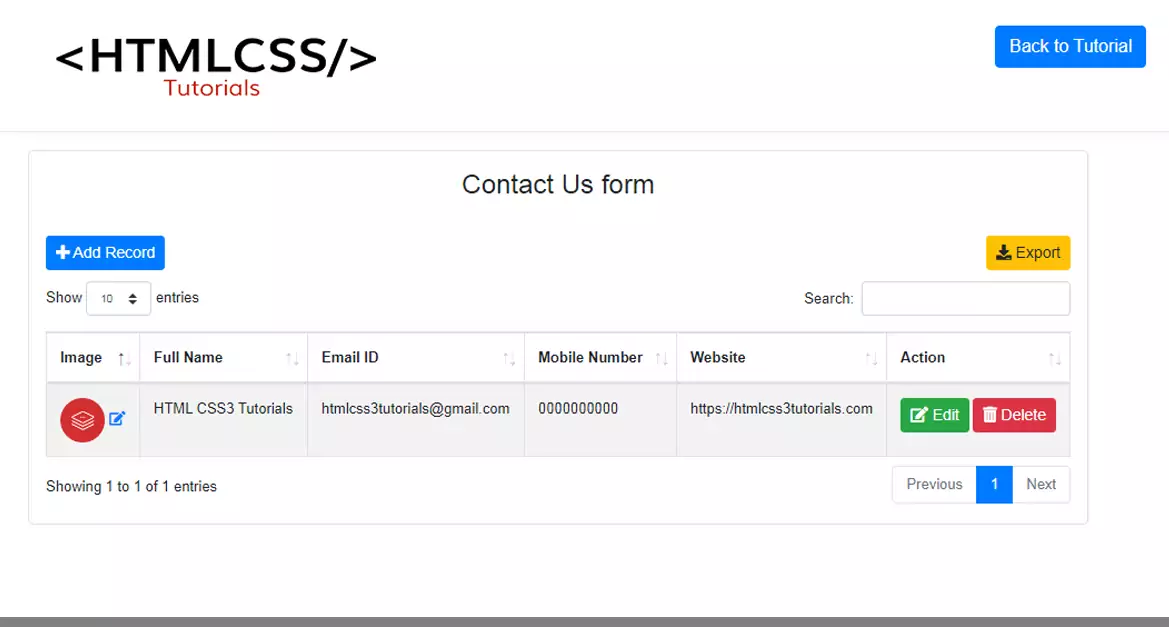
Create index.php to display the record from the Database using PHP and MySQL. Copy and paste the following code and place it on the index.php
<?php
ob_start();
require __DIR__ . DIRECTORY_SEPARATOR . "lib" . DIRECTORY_SEPARATOR . "config.php";
// HTML
require PATH_LIB . "page-top.php"; ?>
	<section class="testimonial py-3" id="testimonial">
<div class="container">
	<div class="row">
<form method='post' action='downloadCsv.php'>

<div class="col-md-12 py-3 border rounded shadow-sm">
	<h4 class="pb-4 text-center">Contact Us form</h4>
	<div class="row" style="margin-bottom: 10px;">
<div class="col-md-10">
	<a href="#" class="btn btn-primary btn-sm" id="clickHere"><i class="fa fa-plus" aria-hidden="true"></i>
	Add Record</a>
</div>
<div class="col-md-2 text-right">
<button type='submit'  class="btn btn-sm btn-warning"  value='Export' name='Export'>
	<i class="fa fa-download" aria-hidden="true"></i> Export
	</button>

</div>
	</div>

	<table id="example1" class="table table-bordered table-striped">
<thead>
	<tr>
<th>Image</th>
<th>Full Name</th>
<th>Email ID</th>
<th>Mobile Number</th>
<th>Website</th>
<th>Action</th>
	</tr>
</thead>
<tbody>
	<?php

      $result = $DB_con->prepare("SELECT * FROM demorecords");
$result->execute();
	 	$user_arr = array();
for($i=0; $row = $result->fetch(); $i++){
	 $fullName = $row ['fullName'];
	 $email = $row ['email'];
	 $mobile = $row ['mobile'];
	 $website = $row ['website'];
	$user_arr[] = array($fullName,$email,$mobile,$website);
	  ?>
	<tr>
<td><img src="imageDocument/<?php echo $row ['directory']; ?>" class="displaygr" />
	<a href='#imgid_<?php echo $row['recID']; ?>'  data-toggle='modal'><i class="fas fa-edit"></i></a></td>
<td><?php echo $row ['fullName'];?></td>
<td><?php echo $row ['email']; ?></td>
<td><?php echo $row ['mobile']; ?></td>
<td><?php echo $row ['website']; ?></td>
<td>
	<a href='#edit_<?php echo $row ['recID']; ?>' class='btn btn-success btn-sm' data-toggle='modal' id="clickedit"><i class="fas fa-edit"></i> Edit</a>
	<a href='#delete_<?php echo $row ['recID']; ?>' class='btn btn-danger btn-sm' data-toggle='modal'><i class="fas fa-trash-alt"></i> Delete</a>
</td>
	</tr>
	<?php
	include('editRecord.php');
	include('deleteRecord.php');
	include('editImage.php');
}

	 ?>
	 <?php
            $serialize_user_arr = serialize($user_arr);
            ?>
            <textarea name='export_data' style='display: none;'><?php echo $serialize_user_arr; ?></textarea>
</tbody>
	</table>

</div>
	</form>
	</div>
</div>
	</section>
	<?php include('addRecord.php') ?>
<script src="js/sweetalert.min.js"></script>
<?php
	if(isset($_SESSION['status']) && $_SESSION['status'] !="" ){
?>
	<script>
swal( {
	title: "<?php echo $_SESSION['status'] ; ?>",
	icon: "<?php echo $_SESSION['statusCode'] ; ?>",
	button: "Ok. Done!",
});


	</script>
	<?php
   unset( $_SESSION[ 'status' ] );
header("refresh: 1;");
	}
	?>
	<?php ob_end_flush(); require PATH_LIB . "page-bottom.php"; ?>
3. Create addRecord.php page
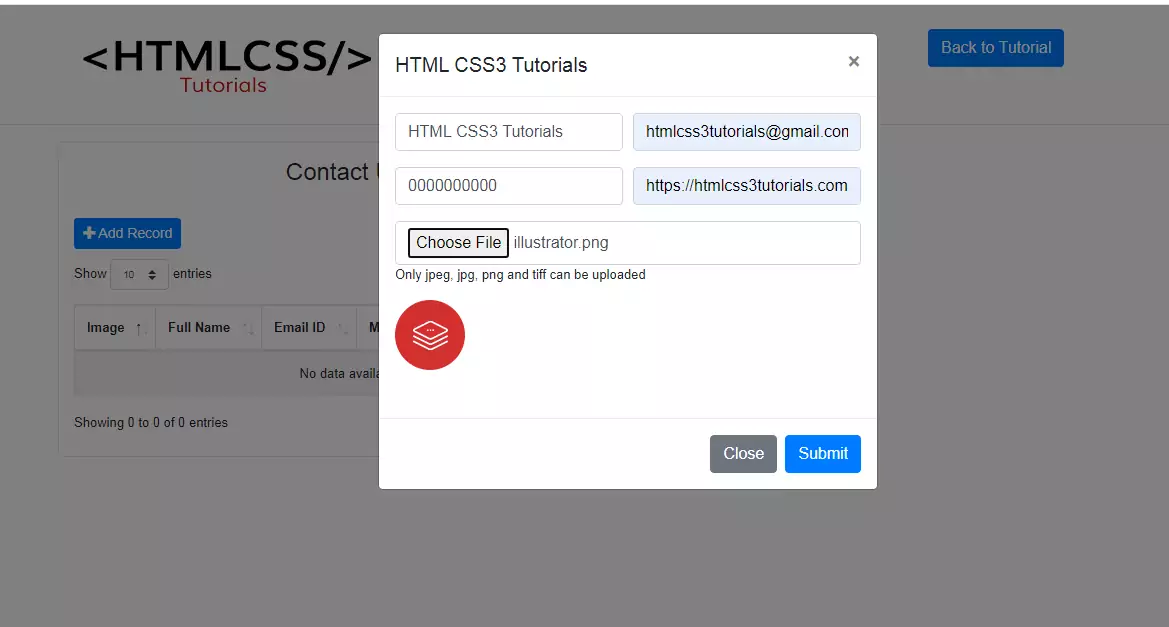
Here I using Bootstrap to design the HTML form and taking four input fields and one input type file field to allow to pick the file and upload it in the server directory path.
The form <form> tag contain two attributes.
1. Method (method=”post”): It should send the form data to the server for record insert into the database using the HTTP POST method.
2. enctype=”multipart/form-data”, Enctype is the type of encoding that specifies the form-data needs to be encoded as MIME multipart when submitting the form.
Paste the following code in addRecord.php to create a modal popup form to insert data in the database using PHP and MySQL.
In the PHP PDO it is easy to upload documents in the server directory path and also easy to store the directory path in the MySQL database.
You can easily upload pdf, word, jpg, gif, videos, and much more. With the help of PHP PDO, we can easily restrict the file extension while uploading the documents on the server.
<?php
if ( isset( $_POST[ 'addRecord' ] ) ) {
$fullName = $_POST[ 'fullName' ];
$email = $_POST[ 'email' ];
$mobile = $_POST[ 'mobile' ];
$website = $_POST[ 'website' ];
$imgFile = $_FILES['storeImg']['name'];
$tmp_dir = $_FILES['storeImg']['tmp_name'];
$imgSize = $_FILES['storeImg']['size'];
$upload_dir = 'imageDocument/'; // upload directory
$imgExt = strtolower(pathinfo($imgFile,PATHINFO_EXTENSION)); // get image extension
// valid image extensions
$valid_extensions = array('JPEG','jpg','png'); // valid extensions
// rename uploading image
$directory = $fullName.'-'.rand(1000,1000000).".".$imgExt;
//$directory = $upload_dir.$storeImgPath;
// allow valid image file formats
if(in_array($imgExt, $valid_extensions)){
// Check file size '5MB'
if($imgSize < 5000000){
move_uploaded_file($tmp_dir,$upload_dir.$directory);
}
else{
$errorMSG = "Sorry, your file is too large.";
}
}
else{
$errorMSG = "Sorry, only PDF, DOC and CSV files are allowed.";
}
$user_data->addRecords($fullName, $email, $mobile, $website,$directory);
}
?>
<div class="modal fade" id="popup" tabindex="-1" role="dialog" aria-labelledby="exampleModalLongTitle" aria-hidden="true">
<div class="modal-dialog" role="document">
<form id="signupForm" method="post" enctype="multipart/form-data">
<div class="modal-content">
<div class="modal-header">
<h5 class="modal-title" id="exampleModalLongTitle">HTML CSS3 Tutorials</h5>
<button type="button" class="close" data-dismiss="modal" aria-label="Close">
<span aria-hidden="true">×</span>
</button>
</div>
<div class="modal-body">
<div class="form-row">
<div class="form-group col-md-6">
<input id="fullName" name="fullName" placeholder="Full Name" class="form-control" type="text">
</div>
<div class="form-group col-md-6">
<input type="email" class="form-control" name="email" id="email" placeholder="Email Id">
</div>
</div>
<div class="form-row">
<div class="form-group col-md-6">
<input id="mobile" name="mobile" placeholder="Mobile No." class="form-control" type="text">
</div>
<div class="form-group col-md-6">
<input id="website" name="website" placeholder="Website" class="form-control" type="text">
</div>
<div class="form-group col-md-12">
<input type="file" id="profile-img" name="storeImg" required class="form-control">
<p class="help-block">Only jpeg, jpg, png and tiff can be uploaded</p>
<p style="clear: both;"></p>
<p><img src="" id="profile-img-tag" class="displayImg" /></p>
</div>
</div>
</div>
<div class="modal-footer">
<button type="button" class="btn btn-secondary" data-dismiss="modal">Close</button>
<input class="btn btn-primary" type="submit" name="addRecord" value="Submit" >
</div>
</div>
</form>
</div>
</div>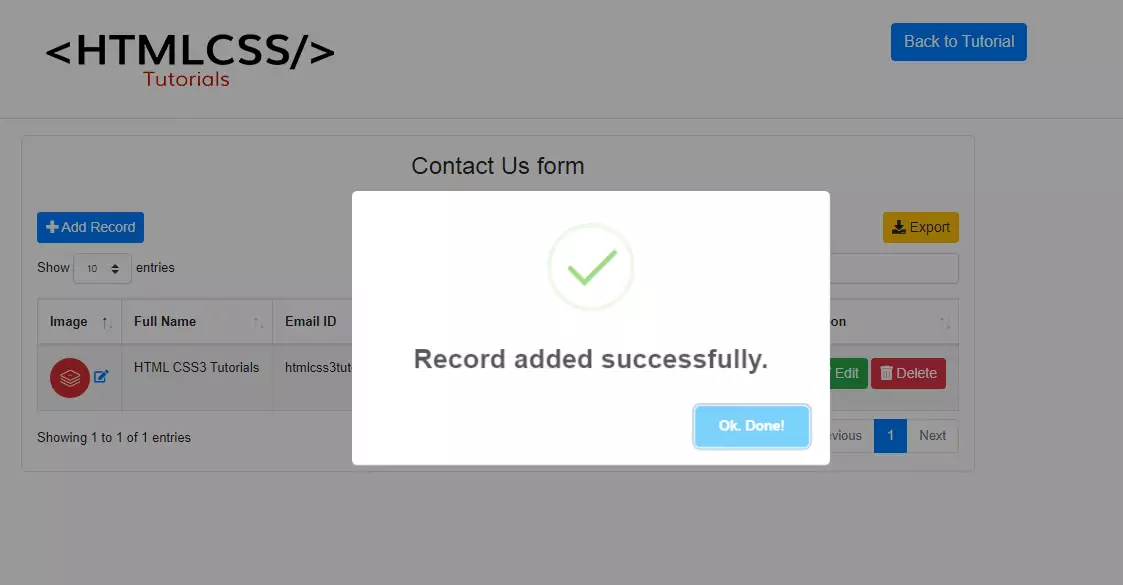
4. Create a common.php
Create common.php to write the PHP PDO code on it. This file will include functions that we will execute in all our PHP and MySQL, that is so we do not have to write down the same code in each PHP file.
<?php
session_start();
require_once 'dbconfig.php';
class ADMIN
{
	private $conn;
	public function __construct()
	{
		$database = new Database();
		$db = $database->dbConnection();
		$this->conn = $db;
    }

	public function runQuery($sql)
	{
		$stmt = $this->conn->prepare($sql);
		return $stmt;
	}

	public function lasdID()
	{
		$stmt = $this->conn->lastInsertId();
		return $stmt;
	}

	public function addRecords($fullName, $email, $mobile, $website,$directory)
	{
		try
		{

			$stmt = $this->conn->prepare("INSERT INTO demorecords(fullName,email,mobile,website,directory)
			       VALUES(:fullName1,:email1,:mobile1,:website1,:directory1)");
			$stmt->bindparam(":fullName1",$fullName);
			$stmt->bindparam(":email1",$email);
			$stmt->bindparam(":mobile1",$mobile);
			$stmt->bindparam(":website1",$website);
			$stmt->bindparam(":directory1",$directory);
			if($stmt->execute()) {
				$_SESSION[ 'status' ] = 'Record added successfully.';
				$_SESSION[ 'statusCode' ] = 'success';
				return true;

				}
				else {
				$_SESSION[ 'status' ] = 'Something went wrong while adding.';
				$_SESSION[ 'statusCode' ] = 'error';

				}
			header( "Location: index.php" );

		}
		catch(PDOException $ex)
		{
			echo $ex->getMessage();
		}
	}

	public function updateRecords($fullName, $email, $mobile, $website,$recID)
	{
		try
		{

			$sql = "UPDATE `demorecords`
   					SET `fullName` = :fullName,
       					`email` = :email,
						`mobile` = :mobile,
       					`website` = :website WHERE `recID` = :recID";
			$stmt = $this->conn->prepare($sql);
			$stmt->bindparam(":recID",$recID);
			$stmt->bindparam(":fullName",$fullName);
			$stmt->bindparam(":email",$email);
			$stmt->bindparam(":mobile",$mobile);
			$stmt->bindparam(":website",$website);
			if($stmt->execute()) {
				$_SESSION[ 'status' ] = 'Record updated successfully.';
				$_SESSION[ 'statusCode' ] = 'success';
				return true;
			}
				else {
				$_SESSION[ 'status' ] = 'Something went wrong while record updating.';
				$_SESSION[ 'statusCode' ] = 'error';
				}
			header( "Location: index.php" );

		}
		catch(PDOException $ex)
		{
			echo $ex->getMessage();
		}
	}

	public function deleteRecords($recID)
	{
		try
		{

			$sql = "DELETE FROM `demorecords`  WHERE `recID` = :recID";
			$stmt = $this->conn->prepare($sql);
			$stmt->bindparam(":recID",$recID);
			if($stmt->execute()) {
				$_SESSION[ 'status' ] = 'Record deleted successfully.';
				$_SESSION[ 'statusCode' ] = 'success';
				return true;
			}
				else {
				$_SESSION[ 'status' ] = 'Something went wrong while record deleting.';
				$_SESSION[ 'statusCode' ] = 'error';
				}
			header( "Location: index.php" );

		}
		catch(PDOException $ex)
		{
			echo $ex->getMessage();
		}
	}

	public function updateImg($recID, $directory)
	{
		try
		{

			$sql = "UPDATE `demorecords`
   					SET `directory` = :directory WHERE `recID` = :recID";
			$stmt = $this->conn->prepare($sql);
			$stmt->bindparam(":recID",$recID);
			$stmt->bindparam(":directory",$directory);
			if($stmt->execute()) {
				$_SESSION[ 'status' ] = 'Image uploaded successfully.';
				$_SESSION[ 'statusCode' ] = 'success';
				return true;
			}
				else {
				$_SESSION[ 'status' ] = 'Something went wrong while record updating.';
				$_SESSION[ 'statusCode' ] = 'error';
				}
			header( "Location: index.php" );

		}
		catch(PDOException $ex)
		{
			echo $ex->getMessage();
		}
	}

}
5. Create deleteRecord.php

This page will be used to delete the record from the database on Id wise.
Paste the following on deleteRecord.php file.
<?php
if ( isset( $_POST[ 'deleteRecord' ] ) ) {
$recID = $_POST[ 'recID' ];
$fullName = $_POST[ 'fullName' ];
$email = $_POST[ 'email' ];
$user_data->deleteRecords($recID);
}
?>
<div class="modal fade" id="delete_<?php echo $row ['recID']; ?>" tabindex="-1" role="dialog" aria-labelledby="exampleModalLongTitle" aria-hidden="true">
<div class="modal-dialog" role="document">
<form id="editForm" method="post" action="index.php">
<div class="modal-content">
<div class="modal-header">
<h5 class="modal-title" id="exampleModalLongTitle">HTML CSS3 Tutorials</h5>
<button type="button" class="close" data-dismiss="modal" aria-label="Close">
<span aria-hidden="true">×</span>
</button>
</div>
<div class="modal-body">
<div class="form-row">
<div class="form-group col-md-6">
<input name="fullName" value="<?php echo $row['fullName']; ?>" class="form-control" type="text" readonly>
<input type="hidden" class="form-control" name="recID" value="<?php echo $row['recID']; ?>">
</div>
<div class="form-group col-md-6">
<input type="email" class="form-control" name="email" id="email" value="<?php echo $row['email']; ?>" readonly>
</div>
</div>
</div>
<div class="modal-footer">
<button type="button" class="btn btn-secondary" data-dismiss="modal">Close</button>
<input class="btn btn-primary" type="submit" name="deleteRecord" value="Submit">
</div>
</div>
</form>
</div>
</div>
6. Create editRecord.php
editRecord.php is used to update/edit the record on the database table. this page is similar to addRecord.php. But instead of entering the new record, it will auto-populate the existing data from the database table using PHP and MySQL.
<?php
if ( isset( $_POST[ 'updateRecord' ] ) ) {
$recID = $_POST[ 'recID' ];
$fullName = $_POST[ 'fullName' ];
$email = $_POST[ 'email' ];
$mobile = $_POST[ 'mobile' ];
$website = $_POST[ 'website' ];
$user_data->updateRecords($fullName, $email, $mobile, $website,$recID);
}
?>
<div class="modal fade" id="edit_<?php echo $row['recID']; ?>" tabindex="-1" role="dialog" aria-labelledby="exampleModalLongTitle" aria-hidden="true">
<div class="modal-dialog" role="document">
<form id="editForm" method="post">
<div class="modal-content">
<div class="modal-header">
<h5 class="modal-title" id="exampleModalLongTitle">HTML CSS3 Tutorials</h5>
<button type="button" class="close" data-dismiss="modal" aria-label="Close">
<span aria-hidden="true">×</span>
</button>
</div>
<div class="modal-body">
<div class="form-row">
<div class="form-group col-md-6">
<input name="fullName" value="<?php echo $row['fullName']; ?>" class="form-control" type="text">
<input type="hidden" class="form-control" name="recID" value="<?php echo $row['recID']; ?>">
</div>
<div class="form-group col-md-6">
<input type="email" class="form-control" name="email" id="email" value="<?php echo $row['email']; ?>">
</div>
</div>
<div class="form-row">
<div class="form-group col-md-6">
<input name="mobile" value="<?php echo $row['mobile']; ?>" class="form-control" type="text">
</div>
<div class="form-group col-md-6">
<input name="website" value="<?php echo $row['website']; ?>" class="form-control" type="text">
</div>
</div>
</div>
<div class="modal-footer">
<button type="button" class="btn btn-secondary" data-dismiss="modal">Close</button>
<input class="btn btn-primary" type="submit" name="updateRecord" value="Submit">
</div>
</div>
</form>
</div>
</div>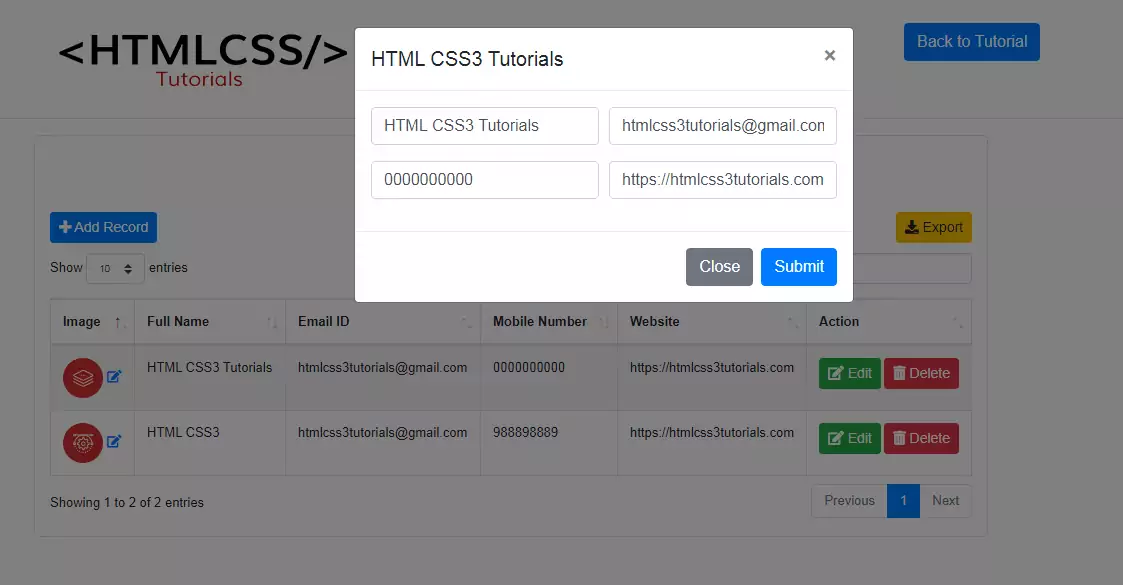
7. Create editImage.php
This page is used to replace the existing images from the images directory and also update the image URL path in the database.

<?php
if ( isset( $_POST[ 'updateImage' ] ) ) {
$recID = $_POST[ 'recID' ];
$imgFile = $_FILES['storeImg']['name'];
$tmp_dir = $_FILES['storeImg']['tmp_name'];
$imgSize = $_FILES['storeImg']['size'];
$upload_dir = 'imageDocument/'; // upload directory
$imgExt = strtolower(pathinfo($imgFile,PATHINFO_EXTENSION)); // get image extension
// valid image extensions
$valid_extensions = array('JPEG','jpg','png'); // valid extensions
// rename uploading image
$directory = $fullName.'-'.rand(1000,1000000).".".$imgExt;
//$directory = $upload_dir.$storeImgPath;
// allow valid image file formats
if(in_array($imgExt, $valid_extensions)){
// Check file size '5MB'
if($imgSize < 5000000) {
move_uploaded_file($tmp_dir,$upload_dir.$directory);
}
else{
$errorMSG = "Sorry, your file is too large.";
}
}
else{
$errorMSG = "Sorry, only PDF, DOC and CSV files are allowed.";
}
$user_data->updateImg($recID, $directory);
}
?>
<div class="modal fade" id="imgid_<?php echo $row['recID']; ?>" tabindex="-1" role="dialog" aria-labelledby="exampleModalLongTitle" aria-hidden="true">
<div class="modal-dialog" role="document">
<form id="editForm" method="post" enctype="multipart/form-data">
<div class="modal-content">
<div class="modal-header">
<h5 class="modal-title" id="exampleModalLongTitle">HTML CSS3 Tutorials</h5>
<button type="button" class="close" data-dismiss="modal" aria-label="Close">
<span aria-hidden="true">×</span>
</button>
</div>
<div class="modal-body">
<div class="form-row">
<div class="form-group col-md-6">
<input name="fullName" value="<?php echo $row['fullName']; ?>" class="form-control" type="text" readonly>
<input type="hidden" class="form-control" name="recID" value="<?php echo $row['recID']; ?>">
</div>
<div class="form-group col-md-6">
<input type="email" class="form-control" name="email" id="email" value="<?php echo $row['email']; ?>" readonly>
</div>
</div>
<div class="form-row">
<div class="form-group col-md-12">
<input type="file" id="profile-img2" name="storeImg" required class="form-control">
<p class="help-block">Only jpeg, jpg, png and tiff can be uploaded</p>
<p style="clear: both;"></p>
<p><img src="imageDocument/<?php echo $row ['directory']; ?>" id="profile-img-tag2" class="displayImg" /></p>
</div>
</div>
</div>
<div class="modal-footer">
<button type="button" class="btn btn-secondary" data-dismiss="modal">Close</button>
<input class="btn btn-primary" type="submit" name="updateImage" value="Submit">
</div>
</div>
</form>
</div>
</div>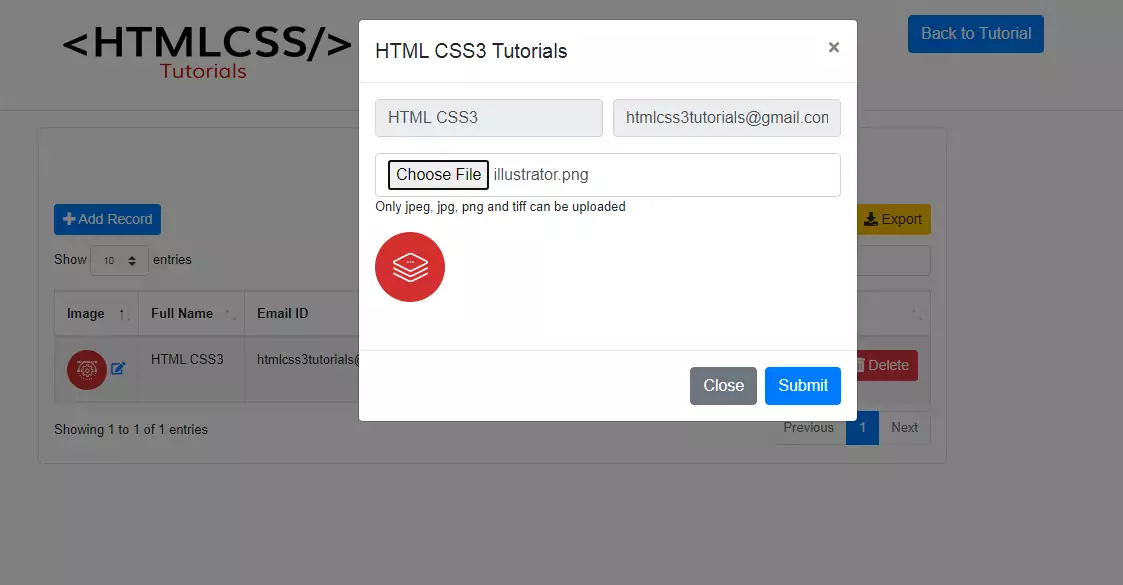
8. Create downloadCsv.php
downloadCsv.php this is used to fetch the record and download the data in a CSV file using PHP and MySQL.
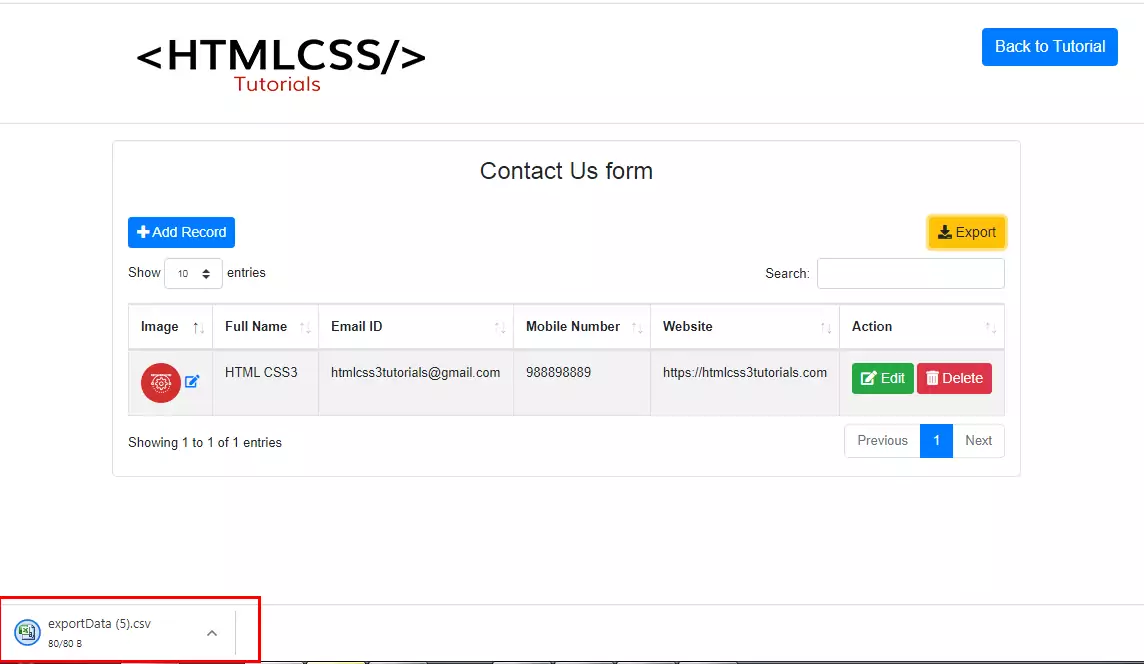
Paste the following PHP PDO code in the downloadCsv.php file.
<?php
$filename = 'exportData.csv';
$export_data = unserialize($_POST['export_data']);

// file creation
$file = fopen($filename,"w");

foreach ($export_data as $line){
  fputcsv($file,$line);
}

fclose($file);

// download
header("Content-Description: File Transfer");
header("Content-Disposition: attachment; filename=".$filename);
header("Content-Type: application/csv; ");

readfile($filename);

// deleting file
unlink($filename);
exit();
?>
9. Create dbconfig.php
This function will connect to the database. copy and paste the below code and paste it on dbconfig.php to connect the database. Below the PHP PDO code to open the connection between the database wrap with try/catch using PHP PDO extension.
<?php
class Database
{

    private $host = "localhost";
    private $db_name = "demotutorials";
    private $username = "root";
    private $password = "";
    public $conn;

    public function dbConnection()
	{

	    $this->conn = null;
        try
		{
            $this->conn = new PDO("mysql:host=" . $this->host . ";dbname=" . $this->db_name, $this->username, $this->password);
			$this->conn->setAttribute(PDO::ATTR_ERRMODE, PDO::ERRMODE_EXCEPTION);
        }
		catch(PDOException $exception)
		{
            echo "Connection error: " . $exception->getMessage();
        }

        return $this->conn;
    }
}
$DB_HOST = 'localhost';
	$DB_USER = 'root';
	$DB_PASS = '';
	$DB_NAME = 'demotutorials';

	try{
		$DB_con = new PDO("mysql:host={$DB_HOST};dbname={$DB_NAME}",$DB_USER,$DB_PASS);
		$DB_con->setAttribute(PDO::ATTR_ERRMODE, PDO::ERRMODE_EXCEPTION);
	}
	catch(PDOException $e){
		echo $e->getMessage();
	}
?>
Conclusion
Congratulations! You’ve successfully created an Insert edit and delete using PHP and MySQL. You can modify this code as per your requirement
If you enjoyed this tutorial so please do not forget to share on social media and take a look at our many extra tutorials on our website.


